Get Started (Lua)
Table of contents
What is Alloverse?
Alloverse is an open platform for collaborative workspaces in 3D. It’s Gibson-style Cyberspace - but for day-to-day work and play with friends and colleagues. It’s a VR and AR platform for creating spaces, and for running real applications within those spaces, together with other people. In nerd terms, it’s a VR/AR/3D “window manager” and collaborative workspace.
For more information, please see the Alloverse website.
- Your “Place” is where you decorate, run apps, invite people, and hang out. A “place” is a server. It’s like a collaborative X11 server: It runs a world simulation server, a voip gateway, and all the backing data for 3d UIs for the running apps. (You can check out the reference implementation on Github).
- A “visor” is the GUI application you use to visit places and interact with your apps. It’s sort of the VR equivalent of a web browser. It’s what you download from our website to get started. (its reference implementation is of course also on github.)
- An “app” or “alloapp” is a process running on a server, which connects to a Place to show its user interface to people interacting with it. It’s sort of like a web page or X11 process. We’ll be building such an alloapp today.
- The network and “UI protocol” is taken care of by the allonet library, written in C and used by all the above projects.
Developing an Alloverse App
An Alloverse app is a server-side app that you run on your own server, similar to how you would host a web app on your own server. The difference is, when a user goes to your app on the web, it loads into that user’s web browser on their computer; but when a user goes to your alloapp in an Alloverse Place, the app loads into the Place for all users in that Place to use, and your code gets collaboration and VR super-powers for free.
This tutorial will take you through creating an Alloverse app using the Lua programming language, since that is the language we’ve developed the most support for so far.
You can build apps on Mac, Linux or Windows. On Windows, you’ll need a Unix shell, preferrably WSL2 (but mingw/msys2 could also work if you’re lucky): follow this WSL installation guide and install Ubuntu.
In contrast to a web framework like Rails or Django, Alloverse doesn’t install any software onto your system. Instead, a project is completely self-contained within its project folder, and contains everything it needs to run.
Note that building alloapps is done completely in text (through VSCode and Terminal), and there are currently no graphical editors (like the scene editor you might be used to from Unity or Unreal).
Prerequisites
To write your own Alloverse app, you’ll need the following:
- The Alloverse Visor is the official application that serves as the window through which you can view and interact with the Alloverse. At a later stage you should try installing it on a VR headset, but for the purposes of this guide we recommend and assume you’ll be using the desktop version.
- A terminal app (preinstalled on Mac and Linux, separate install on Windows).
- A plain text editor for code (We recommend Visual Studio Code).
- Git (Comes with Xcode on Mac. If you just type
gitinto a terminal, it’ll ask to install it for you even without Xcode). - Git Large File Storage
- Only on Windows: WSL2 (or if you’re up for some manual work, Cygwin or MingW)
Running the Alloverse Visor
Let’s begin by opening the window to Alloverse by getting the Visor running and connected to a Place. Open the app you just downloaded, press the “Connect” button and enter “Sandbox” in the input field. Alternatively, if you’re on a Mac, clicking this link will automatically do the above for you.
That’s it - you’re now inside the Alloverse Sandbox Place, providing you a way to view and interact with the app you’ll be developing in the next step.
Creating your project
Now, let’s use the terminal to create a project folder, and ask AlloAssist to initialize a base project with all dependencies into it. From your terminal:
$ mkdir allo-todo
$ cd allo-todo
$ git init
$ /bin/bash -c "$(curl -fsSL https://raw.githubusercontent.com/alloverse/alloapp-assist/master/setup.bash)"
If all went well so far, you should now be able to run ./allo/assist help to review all available commands. This might also be a good time to run git commit -a, so the next commit only contains your own changes.
Anyway, the curl’d script will have created this project structure for you:
luacontains the Lua source code for your applua/main.luacontains your app! It barely does anything yet. But you can add more code to this file to keep going, and add more files into lua to modularize your code.
imagescontains images you want to use as textures on buttons, etc.allocontains the Alloverse app framework. You should not edit anything in here, as an upgrade of the framework will overwrite your changes.allo/assistis a script that helps you with tasks such as starting a server, installing dependencies, etc…allo/libscontains compiled C dependencies as dynamic libraries and executables. These are.gitignored to save space. If you check out your code on another computer, you can./allo/assist fetchto install them again, so you don’t need to (and shouldn’t) commit them.allo/boot.luasets up the runtime environment for your app. This code is generated, so it’s not recommended to modify this file.
Trying your app out
You should now be able to make your app appear in an Alloplace! In the terminal, run the following command:
$ ./allo/assist run alloplace://sandbox.places.alloverse.comIf everything checks out, go to the Alloverse Visor, where you should be able to see and interact with the app and its button. (If you’ve moved around in the place, you may need to look around to see it)
 Our app running in Nevyn’s place. I’ve clicked our simple app’s orange button button three times, and the laws of causality held up, printing “Hello” thrice to our terminal.
At this point, you could go off, do your own thing, read the documentation as you go. Or you could keep reading, and be guided through the development of a simple but functional todo list app, which will help establish the fundamentals and make it much easier for you to build real, complex apps.
If your app ever disappears, take a look around in the Alloverse to make sure you’re not just looking in the wrong direction. If you still can’t see it, it might have crashed. Check out the terminal from which you ran it - there should be error messages to help you figure out what went wrong.
This is also a good point at which to remind you: if you get stuck, or have questions or feedback, please hop on Discord and give it to us straight.
Anatomy of Hello World in the Alloverse
Let’s open up lua/main.lua and have a look at the code, to understand what’s going on. If you’re not much for theory, you may skip this section and get straight to making an app.
local client = Client(
  arg[2],
  "allo-todo2"
)
local app = App(client)
Above, we’re using a Client to connect this app to a Place. arg[2] is the URL of the place to connect to, which Assist sets up for you in boot.lua. App then manages the Client connection for you, and manages the lifetime of your app.
assets = {
  quit = ui.Asset.File("images/quit.png"),
}
app.assetManager:add(assets)
Assets are files (images, glb models, videos, sounds, etc…) that you want to use in your app. They need to be published so that users’ visors can download them before you can use them. We make assets global so you can use it throughout your app.
local mainView = ui.Surface(ui.Bounds(0, 1.2, -2, 1, 0.5, 0.01))
mainView.grabbable = true
Your application is represented by a hierarchy of views. If you’re a web developer, you can think of it as nested elements in a DOM. If you come from Unity, it’s similar to the GameObject hierarchy, with transforms being relative to parent GameObjects. If you’re an oldschool Macintosh Toolbox developer, I’m sorry.
app.mainView is the main UI for your app. You should set it up with your main user interface before connecting to the Place.
Bounds is the position and size of your object:
- The first three numbers defines the x, y and z positions (see: coordinate space reference). In this case,
0, 1.2, -2means themainViewis centered horizontally 1.2 meters up from the floor and 2 meters into the Place, depth-wise. - The second triplet of numbers refers to the object’s width, depth and height. In this case,
1, 0.5, 0.01defines the object as being 1 meter wide, half a meter tall, and one centimeter deep.
We also make the main view grabbable, so the user can move it around the Place. Alternatively, you can add a GrabHandle, which acts like the title bar of a desktop UI’s window.
local button = ui.Button(ui.Bounds(0.0, 0.05, 0.05, 0.2, 0.2, 0.1))
mainView:addSubview(button)
button.onActivated = function()
  print("Hello!")
end
The standard template has created a standard Button component for you, at 2 decimeters wide and tall. Its position of 5 centimeter down and forward is relative to its parent - in this case the mainView.
The onActivated callback lets us run code when the button is pressed. This’ll print “hello” to your local terminal when you run the app on your machine (even if you’re running the visor somewhere else on the Internet)!
app.mainView = mainView
app:connect()
app:run()
Finally, the template has configured the app’s mainView to use this dummy UI. Then, it connects to the Place we’ve been asked to run in, and finally hands over the runtime of the app to the UI framework so it keeps running until the user quits it.
Now that we got the gist of how to compose an app like this, we can replace it with something useful.
Building your app
Let’s make a todo list app! I’m a master artist, so I’ve painted this piece of art to represent our goal:

So we’ve got:
- A list of items to check off,
- A button to add an item
- A dialog that pops up where you can name your item.
Sounds great. Let’s get started.
Note: This is where we start coding for real.
Select everything from (and including) local mainView = ... down to app.mainView = mainView and delete it, and we’ll write some new, fun code.
Instead of having a bunch of loose views strewn around the code, I enjoy creating a class for each main container of UI. Some equivalent of a “window”, or “view controller”, or “component” if you will. Let’s create a TodosView, which will display the list of items, and allow you to quit the app, and add new items. Copy the code block below, and paste it between app.assetManager:add(assets) and app:connect().
class.TodosView(ui.Surface)
function TodosView:_init(bounds)
  self:super(bounds)
  self.grabbable = true

  self.quitButton = self:addSubview(ui.Button(ui.Bounds{
    size=ui.Size(0.12,0.12,0.05)
  }))
  self.quitButton:setDefaultTexture(assets.quit)
  self.quitButton.onActivated = function()
      app:quit()
  end

  self.addButton = self:addSubview(ui.Button(ui.Bounds{
    size=ui.Size(bounds.size.width*0.8,0.1,0.05)
  }))
  self.addButton.label:setText("Add todo")
  self.addButton.onActivated = function(hand)
    self:showNewTodoPopup(hand)
  end

  self.todoViews = {}

  self:layout()
end
We’re using Penlight’s class macro to create classes. We inherit ui.Surface, which is like a ui.View except it also draws a background, so our app gets a backdrop to rest our controls onto.
We create a constructor, where we set up initial state and controls. Here we want a quit Button, and an add Button. We immediately add them as subviews to the TodosView, so they show up in the view hierarchy. For the first button, we use one of our image assets as a texture, and for the other, we set the text on the label instead.
AlloUI doesn’t have a comprehensive layout system itself, so we’ll call our own layout at opportune moments. Let’s stub it out so we have something to start with. We’ll also create an instance of it, and use it as our app’s main view. Paste the following into your code, just below the _init function:
function TodosView:layout()
  self.quitButton.bounds:moveToOrigin():move( 0.52,0.25,0.025)
  self.addButton.bounds:moveToOrigin():move( 0, -0.15,0.025)
end

app.mainView = TodosView(ui.Bounds(0, 1.2, -2, 1, 0.5, 0.01))
Let’s restart your app to see your new code changes. Open the terminal where your app is running, and quit it with ctrl-C. Then, fire off a quick ./allo/assist run alloplace://sandbox.places.alloverse.com in your terminal, and you’ll be presented with this beauty in Alloverse:
We’ve created a VR interface, how cool is that!? Just keep in mind that while the “Add todo” button is is visible, clicking it will cause the app to crash. So, let’s attach some functionality to it: let’s make it create that popup for inputting new todo items. Paste the following code block right underneath the layout() function:
function TodosView:showNewTodoPopup(hand)
  local popup = ui.Surface(ui.Bounds{size=ui.Size(1,0.5,0.05)})

  local input = popup:addSubview(ui.TextField{
    bounds= ui.Bounds{size=ui.Size(0.8,0.1,0.05)}:move(0, 0.15, 0.025)
  })
  local done = function()
    self:addTodo(input.label.text)
    popup:removeFromSuperview()
  end
  input.onReturn = function()
    done()
    return false
  end
  input:askToFocus(hand)

  local addButton = popup:addSubview(ui.Button(ui.Bounds{size=ui.Size(popup.bounds.size.width*0.8,0.1,0.05)}))
  addButton.bounds:move(0, 0, 0.025)
  addButton.label:setText("Add")
  addButton.onActivated = done

  local cancelButton = popup:addSubview(ui.Button(ui.Bounds{size=ui.Size(popup.bounds.size.width*0.8,0.1,0.05)}))
  cancelButton:setColor({0.4, 0.4, 0.3, 1.0})
  cancelButton.bounds:move(0, -0.15, 0.025)
  cancelButton.label:setText("Cancel")
  cancelButton.onActivated = function()
    popup:removeFromSuperview()
  end

  app:openPopupNearHand(popup, hand)
end
Phew, that’s a handful. Let’s step through it.
popupis our new popup window. It’s another surface, one meter by a half.- To it, we add a TextField! This is your standard issue text input view. Tapping it will give it focus, allowing you to type something in it with your keyboard. (If you would do this while using the Alloverse headset app, it will display a virtual keyboard for you to use.
- We want to close the popup both when the return key is pressed, and when you manually tap the “Add” button, so let’s create a callback we can use for both called
done. onReturnis used to react to return/enter key, and we can also use it to make sure a newline character isn’t added to the text.showNewTodoPopuphas been called with ahand. That’s the hand of the user that tapped the “Add todo button”. It belongs to an avatar, so we can actually ask the avatar if it would pretty please focus this text field, so the user can begin typing in it directly? If you’d be so kind.- The
addButtonuses the samedonecallback asonReturn cancelButtonjust closes the popup, no questions asked.- Finally,
app:openPopupNearHandwill display our new fancy popup 60 centimeters away from the user’s hand, which is a convenient distance at which to do your job.
Warning: incoming rant
The cool thing about this popup is that if you have multiple people in the room, they can all get their own input popup, so they can add their own items without interfering with each other. This is an important and unusual aspect of UI design and development: all your UI is real time collaborative, so you have to consider how your application behaves when multiple people use it at the same time.
For example, if you had added the input field directly to the main view, only one user would’ve been able to add items at a time, and they’d likely have interfered with each other’s work. By using a personal popup, users can work naturally collaboratively and in tandem.
Relax: rant over.
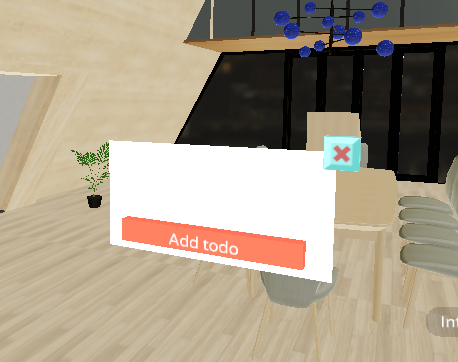
Here’s what this new fancy popup should look like once you tap the “Add todo” button:

Before we continue, we’ll need another asset. Download  checkmark.png and put it in
 images/. Then we’ll have to refer to it from code. At the top of your file, you’re already loading the quit texture asset. Modify that block to also load and publish the checkmark texture, by making the code block look like this:
assets = {
  quit = ui.Asset.File("images/quit.png"),
  checkmark = ui.Asset.File("images/checkmark.png"),
}
Cool. Cool cool cool. Let’s make it actually possible to add todo items, yeah? Add these two functions below your existing ones:
function TodosView:addTodo(text)
  local todoView = ui.View(ui.Bounds{size=ui.Size(self.bounds.size.width*0.8,0.1,0.05)})

  local checkButton = todoView:addSubview(ui.Button(ui.Bounds{size=ui.Size(0.1, 0.1, 0.05)}))
  checkButton.bounds:move(-self.bounds.size.width/2 + checkButton.bounds.size.width, 0, 0)
  checkButton:setDefaultTexture(assets.checkmark)
  checkButton.onActivated = function()
    self:removeTodo(todoView)
  end

  local label = todoView:addSubview(ui.Label{
    bounds= todoView.bounds:copy():inset(0.1, 0.05, 0):move(0.05, 0,0),
    color= {0,0,0, 1},
    halign= "left",
    text= text
  })

  table.insert(self.todoViews, todoView)
  self:layout()
  self:addSubview(todoView)
end

function TodosView:removeTodo(todoView)
  local index = tablex.find(self.todoViews, todoView)
  table.remove(self.todoViews, index)
  todoView:removeFromSuperview()
  self:layout()
end
This should start to look familiar.
todoViewis the parent view of all the controls related to the todo list item. We store them inself.todoViewsso we can layout them properly later.checkButtonis used to check off a completed item. We place it along the left edge, tell it to use our new fancy checkmark texture, and configure it to call an as-of-yet nonexistentremoveTodomethod.labelis the text label describing our item. Text is black (that’s a list of Red, Green, Blue and Alpha, with components from 0.0 to 1.0), horizontally aligned to the left, with the text from the user.- We call
layoutso our new item is positioned correctly - And then we add it as a subview, yay!
removeTodo just finds the given item in the list, and removes it from both the list and the UI, running a relayouting pass to adjust the other items’ positions.
That’s awesome! We can now add and remove todo list items! Just one bummer: they all end up stacked on top of each other. We’ll need to lay them out before this is usable. Let’s replace our dummy layout with something better. Remove the existing contents of your layout function, and type in this:
function TodosView:layout()
  local height = #self.todoViews * 0.13 + 0.25

  local pen = ui.Bounds{
    size=self.addButton.bounds.size:copy(),
    pose=ui.Pose(0, -height/2, self.addButton.bounds.size.depth/2)
  }
  pen:move(0, 0.07, 0)
  self.addButton:setBounds(pen:copy())
  pen:move(0, 0.15, 0)
  for i, v in ipairs(self.todoViews) do
    v:setBounds(pen:copy())
    pen:move(0, 0.13, 0)
  end

  self.quitButton.bounds:moveToOrigin():move( 0.52, height/2, 0.025)
  self.quitButton:setBounds()

  self.bounds.size.height = height
  self:setBounds()
end
Here’s a pattern I’ve brought with me all the way back from building black-and-white Mac apps in the 80s: using a pen variable which represents a rectangle (or rather, a 3D box!) where we want to “stamp out” our UI, moving the pen as we walk through our items.
- We want to adjust the height of our UI to exactly fit our items. Each item is 13 cm tall, and then there’s 25 cm of padding for the “Add todos” button.
- The add button’s size is a perfect template for our pen. Let’s start the pen at the bottom of the window and lay out controls bottom-to-top, and also move it out from the surface so that our elements sit ON TOP of the surface, instead of embedded in it.
- Let’s add 7 cm of initial padding
- There. Stamp the pen’s current state into the add button’s bounds.
- Add another 15 cm of padding.
- Stamp the pen onto each todo item view, adding 13 cm of padding for each item.
- Figure out the perfect new location for the quit button, and…
- Set the height of the whole app to the one we calculated at the start, and update the bounds so it’s reflected on the users’ headsets.
You know what? I think this is pretty stellar. This’ll do nicely. If you dotted every i, your app should look something like this:
Deploying your app
So, you built your fancy VR app. Now you want to show it off, and deploy it so all the Alloverse users in the world can run it in their places, right?
Well, you’re in luck! Go ahead and learn about hosting an Alloverse app!
Celebration
If you made it this far, go eat a cinnamon roll, you deserve it. It’s on me. Really, just ping me on Discord and it’s yours. We’d at least love to hear from you, and see your creations.
Once you make your own apps, even if you’re not down with cinnamon rolls, do let us know, so we can feature your app in our app browser, blog and tweet about it, etc etc.
Advanced Concepts
Running your own Place server
If you’re feeling ambitious, you can boot a Place of your own using the docker run -e ALLOPLACE_NAME="my place" -p 21337:21337/udp -it alloverse/alloplace2 command. In the Alloverse connect input, enter the name of the place you just created.
Building something more advanced
- How to build a VR retro arcade on our blog steps you through building a SNES emulator in VR.